
The Lucid integration with Schoology will be retired in July 2025. After this date, any Lucid links embedded via the integration will no longer work. To continue using Lucid in Schoology for existing assignments, or new assignments, follow the steps below.


Creating force-copy links of Lucid documents, and pasting them in Schoology will allow teachers to send out a link to students that will automatically generate a copy of the Lucid document for each student to work on and then turn in through Schoology with a URL submission. | How to Video 


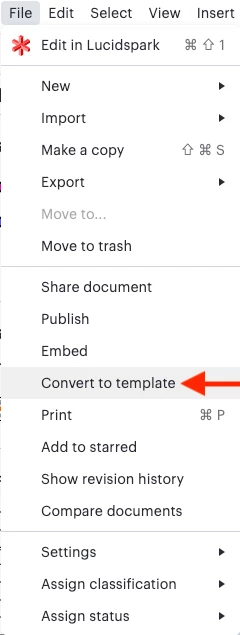
Step 1: Convert your Lucid document to a template | Open you Lucid document, click on file, and select “Convert to template” from the drop down menu.


Step 2: Go to the templates section of your Lucid dashboard and click on “created by me.”

AD_4nXeVFo9KdcrGcShpDpDJVPKzKTNh8kzLFuyX4PEN2j1diTlc1wpnNNsFnBcHJyAeYjRjCK3LaQCxznD6mKr02XcrCJx-Fjy7NGJyf_0iRJLztdre3aHmuPcOUdwuFRYar9oQAE1JiQ?key=8Zf-3v5SLl8dVwjrXJ2sr00i


Step 3: Click on the “eye-ball” preview button on your template.

AD_4nXdFisK4kOq-ognUTZ0Hb-GIpAsXDYY3lupGkpJ7tQAxZR7A_uMGRuBA3JJ-Mf04d4ibBLEkyNJbaTOxxS6uHilIKP2jr_BAqM3VoGm6VM-5gklLZKcJEkYiRzgBhNzreDX4sBncow?key=8Zf-3v5SLl8dVwjrXJ2sr00i


Step 4: Click on the link icon next to the title of your template.

AD_4nXdbfDku7As0LBOVhx401Zev6RMhTuXqYM9W9Ddy64YNLreC6XYdpwDWImxp1LP-pMl0w2wJj0X6Lorv_NtIfjUhMz8HkfCdqrDtJpukh-wuwBZqHs9gY6ybFyS3m0cncWZfkdUKPw?key=8Zf-3v5SLl8dVwjrXJ2sr00i


Step 5: Choose the access permissions from the drop down menu | “Any logged in user” is recommended for sending out templates to students to avoid any permission issues.

AD_4nXdnPy82ipTRUujcBuilVd_0-IXeHSuHMJlNdkwjA04Ge2ib0rio3JkwECIpHrHPBoHlk0D4v3k0WaZrDHLF4O1qcA6wkBG2LqjG7cEKb7OlL9s0KdXE3Wf68GYcoQyGY8BwE3_5QQ?key=8Zf-3v5SLl8dVwjrXJ2sr00i


Step 6: Click “Save and copy link” 

AD_4nXdbVbogpmQLoeybqDW6OrT774I2tjEoNv05493o2DP6FDah3zZIruDHTWJuP7-MABdm3V3pFVAFXcPEehuIb-ffe5KljVQYwEydKnZ5W8ykWZqvQPj_dCuRaW6FL3875iMMSEQmfg?key=8Zf-3v5SLl8dVwjrXJ2sr00i


Step 7: Create an assignment in Schoology 

AD_4nXc7Mw5sxTl_0UQjZaevodZe659B6AUbd_eBespsv7AIOQ6cFC3z9nR_gDerSpbbFt0xZhWjccTViiupPi6ZGEplCbh5vURdbzSVjfYSdnYcBrm57ROcGxggOXcnr4EmY7g9mwdo?key=8Zf-3v5SLl8dVwjrXJ2sr00i


Step 8: Add the link to the Schoology assignment | When students click on the link, they will each get their own copy of the template to work on.

 AD_4nXf9HqFl6aMWDHdu10UWPlDvMhY5IZlq-WYfEkiSnIKLkQunWIRUbQUSo_nWUd5Nt2MH9cq0mQyuIs01JoRekz5vSBX2Tp_fjreNPBCD9-qqHtZiZnmvUgLjk97gRcmFW1DfTmLSzw?key=8Zf-3v5SLl8dVwjrXJ2sr00i


Step 9: When students are done with the activity, they copy the share-link to their document using the blue “share” button in the upper righthand corner of their Lucid document.

AD_4nXcwPlXSegf6TCszieCDfVQL9zwhwDJPT7DqQEIVBa8l0runOvESl8BaTZha7D18HHNBkBP9-_HvqbRuwYmBFpyvclidhHUtN8Y0CVvgzbdUgZFCF6foVacQslDw5nYiLdHhzuMp?key=8Zf-3v5SLl8dVwjrXJ2sr00i


Step 9: Then, students submit their assignment by pasting the share-link in the Schoology assignment. 

AD_4nXdV2DCLyjVNsDGzbGAK_pcY8LsW_0R6VxxFSHcj9A_DrIhyOpGLkD2SjpWvhUIHzUrKj0gmciWdEhgVsefKy319ZBvNAR199GKNe1U2xXoh9RNV0pJ4uM9-QT17YMKUiRkVBvbuUA?key=8Zf-3v5SLl8dVwjrXJ2sr00i


Be the first to reply!

Reply