This post provides the step-by-step instructions on how to configure a custom Okta app so that it will work with SCIM in Lucid’s FedRAMP environment. You can also leverage the Developer documentation for SCIM configuration.
These instructions will work if you are setting up a custom Lucid app for the first time in Okta. However, if you previously had a custom app set up and want to migrate to the new organizational groups experience in Lucid, follow the steps below to ensure that your existing app is set up as needed.
Configure a SAML integration for Lucid
Follow the below instructions exactly regardless of whether you are using Lucidchart, Lucidspark, or both.
Tip: The custom application you will create in the steps below allows you to configure both SAML and SCIM provisioning to work with Lucid.
In Okta:
- Log into your Okta account as an admin.
- Open the Admin UI.
- Select Applications from the left-hand menu.
- From the dropdown options, click Applications.
- Click Create App Integration.
- Select SAML 2.0 as “Sign-in method”.
- Click Next.
- Type in a name for your custom app in Okta that you’ll use for Lucid.
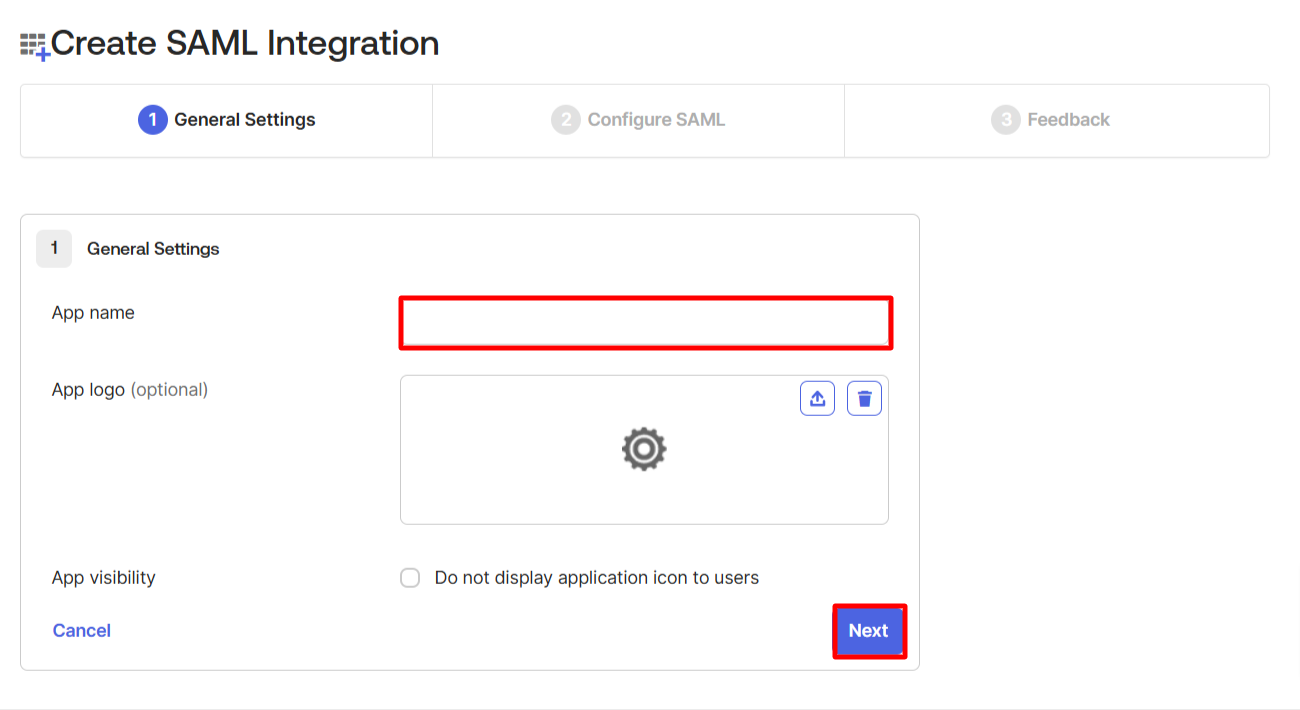
- Click Next.
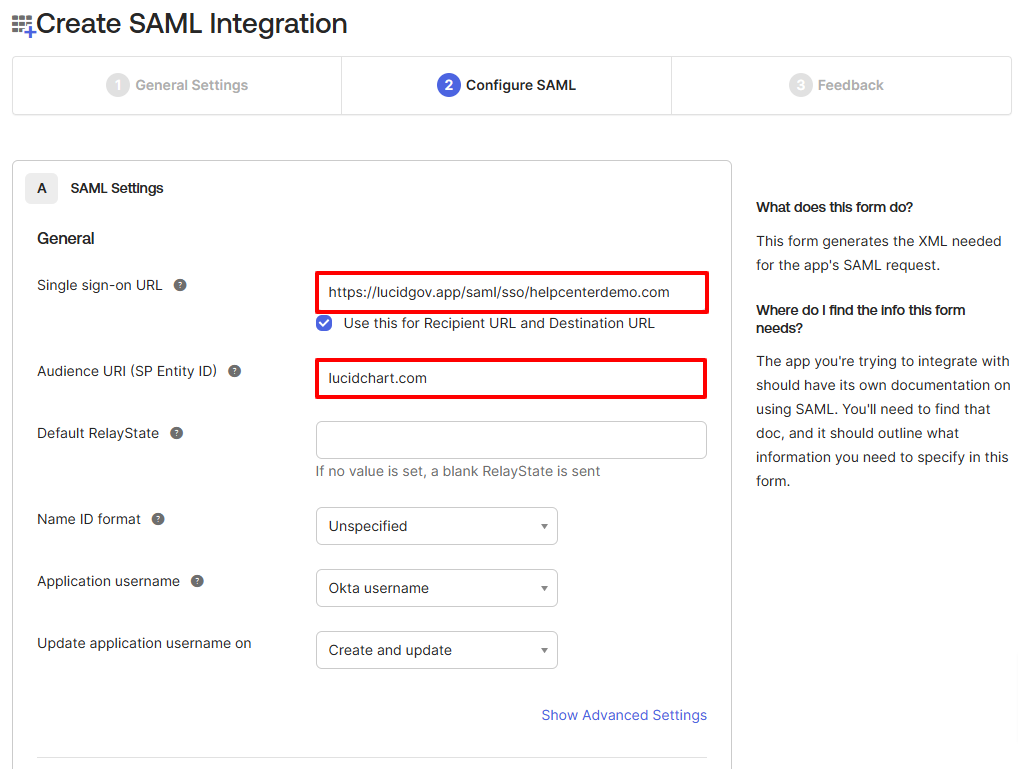
- Populate the following fields:
- Single sign-on URL:
- https://lucidgov.app/saml/sso//yourdomainhere]
- So for example, if your domain is helpcenterdemo.com, your URL would be: “https://lucidgov.app/saml/sso/helpcenterdemo.com” as seen in the screenshot below
- Audience URI (SP Entity ID):
- lucidchart.com
- Leave the remaining fields as they are by default (unless you need to change it for your own configuration needs)
- Single sign-on URL:
- Click Next at the bottom of the page.
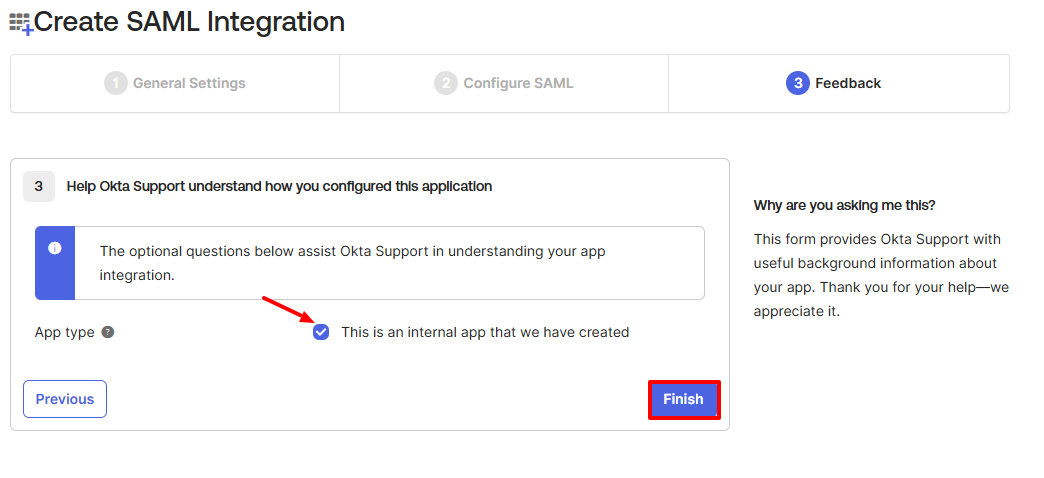
- Check the box for “This is an internal app that we have created”.
- Click Finish.
- To access the Okta metadata, navigate to SAML Signing Certificates.
- Click Actions.
- From the dropdown, select View IdP metadata.
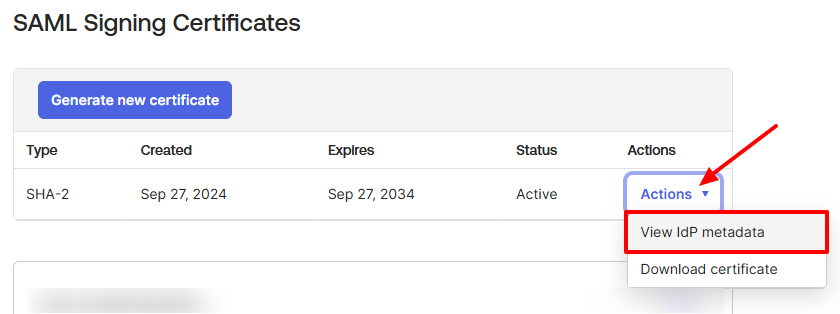
- Download the metadata by right-clicking on the tab that opens up and select Save As, and save as an XML file.
The XML file (metadata) that you just downloaded contains instructions that Lucid will need to communicate with Okta. In the next steps, it will be uploaded into Lucid.
In Lucid:
- Login to Lucid by navigating to https://lucidgov.app.
- Select Admin from the menu to the left.
- Click Security in the left-hand menu.
- From the dropdown, select Authentication.
- Select Configure to the right of the “Allow SAML authentication” option to navigate to your SAML Activation page in Lucid. You will not be able to enable SAML until you have populated your domain and uploaded metadata.

- Under "Lucidchart Sign in URL," enter your Domain name.
- This must match what you entered in the sign-on section in Okta. Ensure the domain you are using is not already in use, which will cause the XML file to not upload properly.
- Click Save changes.
- Scroll down on the SAML Activation page of Lucid and click Add Identity Provider to upload the XML file you downloaded from Okta.
- The metadata will populate the following fields:

- The metadata will populate the following fields:
- Click Test SAML Connection to verify that Lucid is properly communicating with Okta.
- The connection will only work if your custom Lucid app has been assigned to your test user in Okta. You can assign the app to users in the “Assignments” section of the app page in Okta.
- Navigate back to the Authentication page in Lucid.
- Check the box next to "Allow SAML authentication".
- Click Save changes.
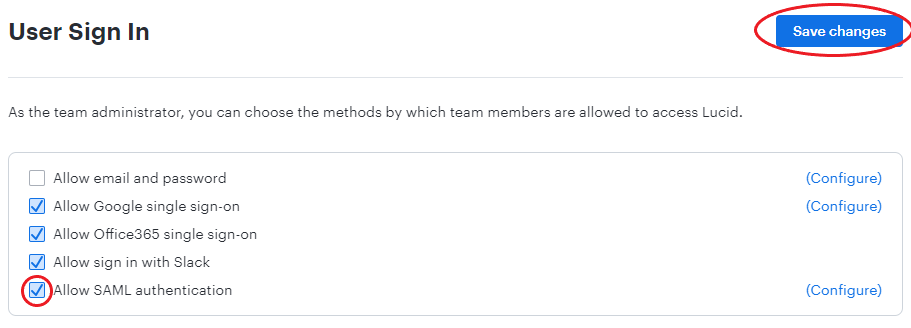
You have the option to use encrypted assertions for the identity providers you add for SAML to your Lucid account. To learn more, refer to our SAML overview article.
Note: You can select the default authentication method in Lucid, after you have checked the methods that you would like to allow as sign in options above. Users will be prompted to sign in using the default authentication you set up in the Authentication page.
Create users upon login with SAML
Once you have configured SAML with Okta for your Lucid account, you can set up Just-In-Time (JIT) provisioning so that users assigned Lucid access in Okta who do not have a Lucid account will have an account created for them upon their first login.
Note: For this provisioning to work you must have domain control enabled.
You can set up Just-In-Time provisioning in the License settings section of your Lucid admin panel.
- If you would like all users to come onto your Lucid account with full-edit licenses, choose the following settings:
- Under the “Access eligibility” section, select Eligible for full access.
- Under “Customized eligibility criteria”, select Instant access.
- If you want all users to come in as limited-access users, under the “Access eligibility” section select Only eligible for limited access.
- Your users will still be able to request full-edit licenses. Depending on the “When a user requests a license” setting, you can have licenses be automatically granted to users upon their request, or you can have the requests turn into pending requests in your user list.
Note: We strongly recommend that you have a custom request dialog if you have users requesting licenses from an admin. Keep in mind that JIT provisioning cannot update, delete, or deactivate a user in Lucid since it only works during a user's first login. That means any update, deletion, or deactivation must be done manually in the Lucid Admin Panel.
Configure SCIM for the Lucid GovSuite in Okta
If you would like to create users before their first log-in through Okta, you can set up the Lucid SCIM integration.
Before configuring SCIM, please do the following:
- Confirm that you are on an Enterprise account on the Lucid GovSuite. To upgrade, contact sales.
- Contact your Lucid Customer Success Manager or contact support to request that SCIM be enabled for your account.
- Make sure that auto-upgrade is enabled in your Licensing settings. You will be unable to generate a bearer token to configure SCIM if this setting is not enabled. You may want to turn off auto-upgrade after generating a bearer token to prevent unwanted licensing during the configuration process.
Once you have followed the pre-configuration steps listed above, you can configure SCIM for the custom Lucid app you previously created in Okta by following these steps:
- Navigate to the custom Lucid app you created in Okta.
- Click the General tab.
- Select Edit.
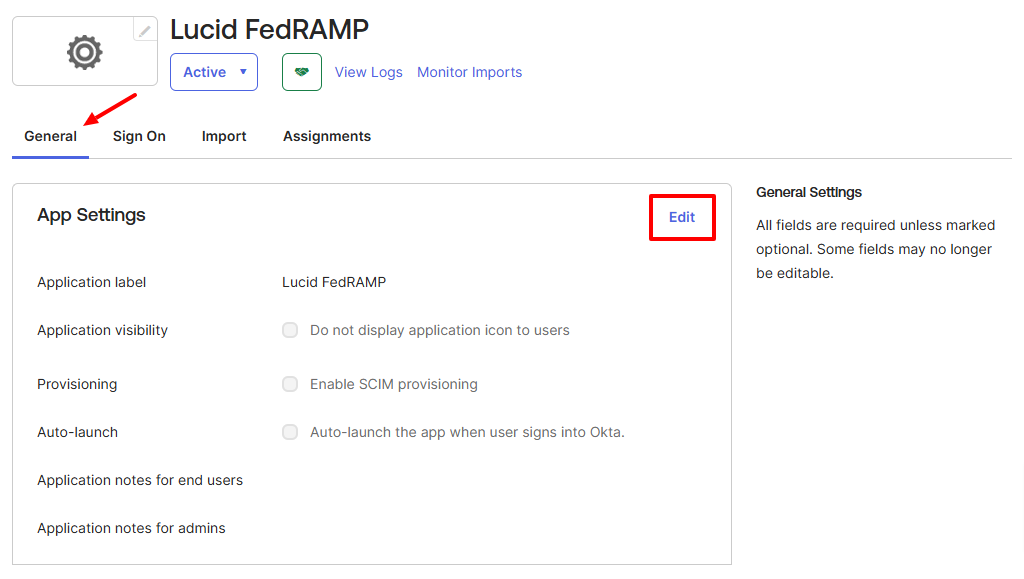
- For Provisioning, check the box for “Enable SCIM provisioning”.
- Click Save.
- Select the Provisioning Tab.
- Click Edit.
- Enter the following information (these are case sensitive):
- SCIM connector base URL - https://users.lucidgov.app/scim/v2
- Unique identifier field for users - userName
- Check the boxes for:
- Import New Users and Profile Updates
- Push New Users
- Push Profile Updates
- Push Groups
- Authentication Mode - HTTP Header
- Authorization - Enter the Bearer token from Lucid using the steps below
- Open Lucid in a new window and select Admin.
- Select App Integration in the left-hand menu.
- Select the SCIM tile.
- Place a check in the box next to “Automatically upgrade account when no more licenses are available”.
- Click Generate token.
- Lucid will populate the "Bearer Token" text field with a unique code for you to share with Okta.
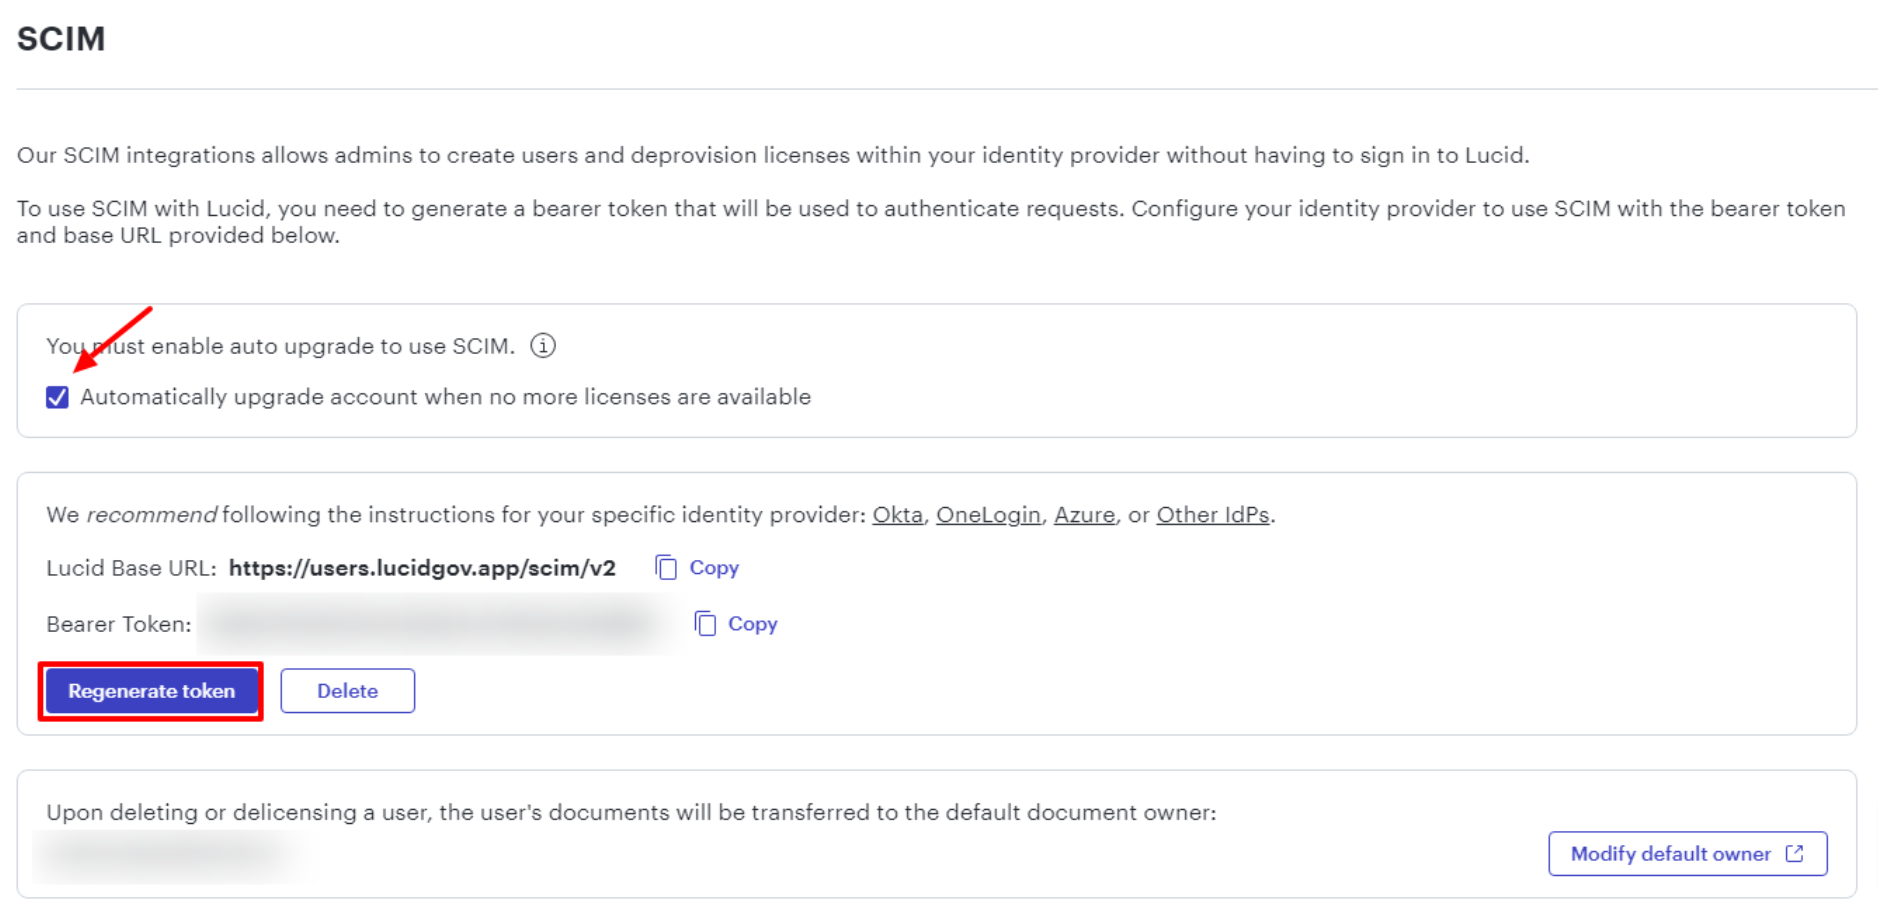
After this step, you may want to disable the auto-grow setting in your Lucid licensing settings page to prevent unwanted licensing from taking place during the remainder of the configuration process. Once you have confirmed that your SCIM connection points are properly set up, you can re-enable auto-grow for user provisioning and licensing to take place.
You will now return to Okta and complete the following steps from the custom Lucid app you created previously:
- Paste the bearer token generated by Lucid into the “Authorization Bearer” token field.
- Click Test Connector Configuration.
- Click Save.
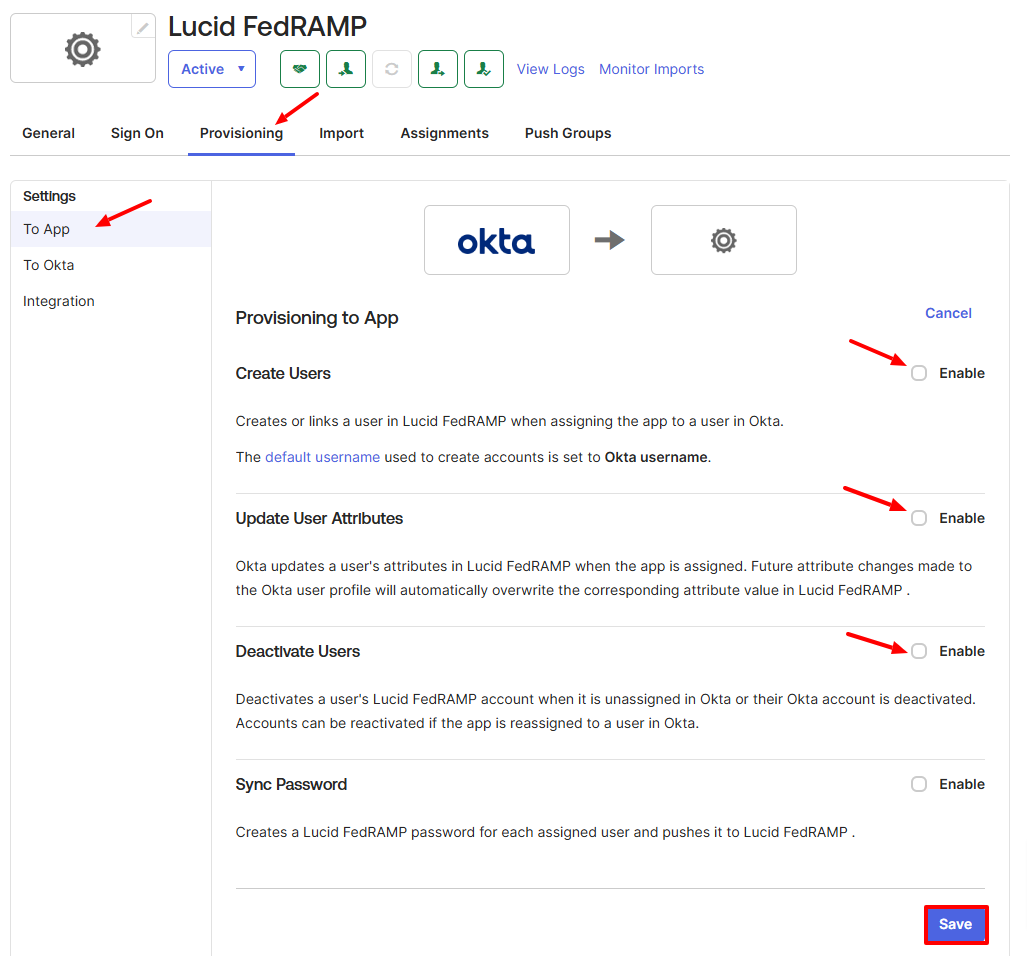
- Once the Lucid and Okta connection is established, click on the Provisioning Tab.
- Under “Settings” on the left-hand side of the page, select To App.
- Click Edit.
- Check the boxes to:
- Create Users
- Update User Attributes
- Deactivate Users
- Sync Password
- Click Save.
Note: Lucid’s FedRAMP environment has a character minimum requirement for passwords. Ensure that your Okta password policy is also set to the same character minimum to successfully provision users into Lucid.
Use SCIM for your custom app in Okta
Now that you have set up a custom SCIM 2.0 app for Lucid in your Okta account, you will follow the instructions found in our Enable Okta SAML and SCIM article to do the following:
- Set up an All users group
- Assign license and delicense groups via group push
- View Okta push groups as organizational groups in Okta
Configure additional SCIM field mappings for title and department (Optional)
You have the option to configure title and department field mappings in SCIM. To do so, follow these steps:
- To include these additional fields in your SCIM push to Lucid, we will need to delete existing mappings in order to create new ones.
- To start, click on the “Provisioning” tab in your custom app.
- If “To App” is not already selected, select it.
- Scroll down on the page and click the “X” to delete the following mapping:
- Title
- Department
-

- Wait ~5 minutes for the mappings to be completely deleted.
- This is just an estimate, it may take less or more time. Wait until it is finished to proceed.
- Click Go to Profile Editor.
- Click + Add Attribute and enter the following information in the relevant fields:
- Display Name: Title
- Variable Name: lucid_title
- External Name: user.title
- External Namespace: urn:ietf:params:scim:schemas:core:2.0:User
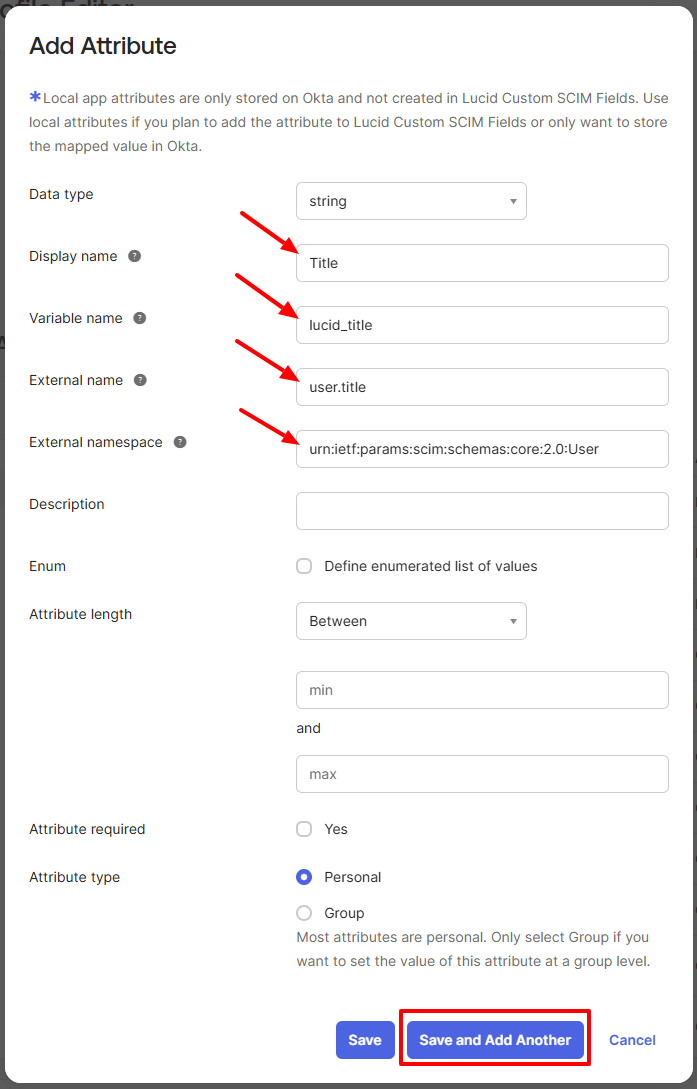
- Click Save and Add Another, then enter the following information:
- Display Name: Department
- Variable Name: lucid_department
- External Name: user.department
- External Namespace: urn:ietf:params:scim:schemas:extension:enterprise:2.0:User
- Click Save.
- Navigate back to your Lucid application in Okta, and select Provisioning.
- Scroll down on the page and locate the three attributes you created in steps 7-9.

- You may need to unhide hidden attributes by clicking the Unhide Unmapped attributes button underneath the attributes.
- Click the pencil icon to the far-right of one the attributes.
- Click the drop-down menu and select Map from Okta Profile.
- In the second drop-down menu that appears, search for the particular attribute you selected.
- For the title attribute, search “title” and select title | string.
- For the department attribute, search “department” and select department | string.
- Then select Create and Update.
- Click Save.
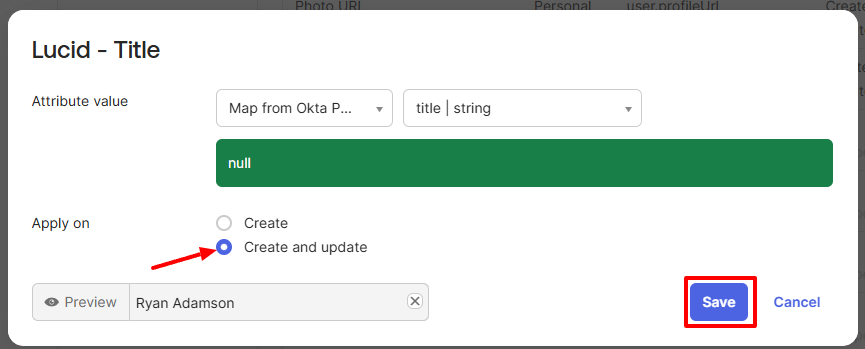
- Here is an example of what this process looks like for the title attribute.
- Repeat steps 10-14 until you have completed the steps for all three attributes.
- If done correctly, your attributes should look like this:

These fields will now populate for this user within Lucid as long as there are values in the fields within Okta.